
DIY -- Dress-Form Using Duck Tape

Hello Crafty Friends,

I decided this winter that I wanted to make a Dress Form that was an exact replica of my body.
(MOMMY TUMMY & ALL ) 
I wish I took a lot more pictures through the whole process, but at the time that I was doing this I was not thinking about becoming a blogger yet.  So I am hoping what I have will suffice.


I put on an old T-shirt that I didn't mind cutting the back of to get me out.  And as you can see with help, we started taping my body from the waist up and crossing my middle.

I used one roll of the Gray Duck Tape that you can buy at any store really.


I decided that I didn't want it to just be Gray, so I bought 4 rolls of Purple Duck Tape.  I needed that many because the yardage is less in Purple than the Gray.  I bought the 20 yard roll.

We patched up areas around that needed it, but we had to make sure that we didn't use too much tape or it would alter the actual size of my body.


So after about 1 hour and half we were ready to cut me out of it.  We cut straight down the back using scissors and cutting into the shirt also.  Looking back I shouldn't have taped half way down my arms because dress forms don't have arms.  I realized that when I couldn't put a shirt over it. LOL


I went to my local hardware store and bought a PVC pipe used for plumbing and they had a Christmas tree stand that was 75% because it was after Christmas.  Now let me tell you I walked around Lowes for about 30-40 min trying to figure out what would hold my form up.  I even thought a bucket of cement would have been a good idea, but then I would never be able to move it.  I just got lucky to be after Christmas and find the stand.

After cutting me out, we taped the back of it back up and started filling it with Polyester Fiber Fill.
I cut out 4 pieces of cardboard the exact size of the bottom, top and both arm holes.  Putting the cardboard on the top made for a sturdy piece to go against the PVC pipe.  I cut out a hole in the bottom cardboard piece so the PVC pipe would go through it. Then I just put purple tape over all the cardboard to match it.


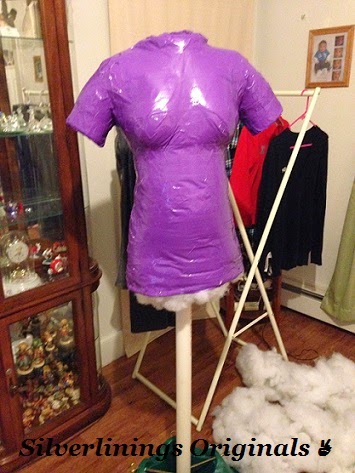
Then I just taped the pipe so everything just flowed.  So as stated above since dress forms don't have arms, I will probably take a razor blade and cut the arms off so it will be more functional for me.

I'm really proud of how it came out.  If for some reason I don't have the heart to cut the arms off, I may just use it as a piece of art in my sewing room.


Until Next Time 

Stephanie

Comments

Popular posts from this blog

DIY -- Hello Kitty Scrub Top -- OOTD

DIY - Hello Kitty Scrub Top What I Wore Today  Fabric from Joann Fabrics  I'm not sure if you can buy this particular print online, but I did see it in a few of their retail stores.  I used Wrights Extra Wide Double Fold Bias Tape accent the pockets and around the top.  If you haven't read my About Me page yet, I state that I work full-time in the medical field.  I don't have to wear scrubs all the time, but when I want to be comfortable it's my go to option!!  I was tired of seeing the same scrub tops I was wearing that day on other co-workers in the hospital and smiling at each other because we didn't know what else to say. I felt like I was in People Magazine on the "Who Wore It Better" page. So I decided to start making my own tops!!  This is the 2nd scrub top that I have ever made.  The first one I made ended up being a complete bust (My Failure) and I never took a pic of it.  I definitely learned for my mistakes (My Triumph) and

Scrub - A - Dub Sunday!! DIY - Scrub Tops

DIY - Scrub Sunday!! I buckled down and add four more scrub tops to my work wardrobe.  I did this really for two reasons. 1) I like how easy and fast it is for me at this moment, very calming and non-stressful sewing! 2) I enjoy the compliments I get from my co-worker for having original scrub tops! If you have not read my Fabric Haul 2 post, please check it out.  There you will find a description of all the fabric I used for these scrub tops.   Fabric Haul 2 My son decided that he wanted to draw all over my pocket template. To learn more about the Ideal Seam Guide that I use while sewing, check out my   Tool I Can't Live Without Post It seemed easier for me to just cut all the fabric out and just sew everything at once. The only thing that was time consuming on these scrubs was changing the thread to match the color of the bias tape being used. The finished products!! So happy!! Can't wait to wear

DIY -- Teal and Gray Circle Scrub Top -- OOTD

DIY - Teal and Gray Circle Scrub Top What I Wore Today  This fabric was purchased at my local Joann Fabrics . It is part of there Easy Care and Wash Collection its called Circle and Lines . It is 40% Polyester and 60% Cotton. I used Wrights Extra Wide Double Fold Bias Tape  and matching thread.  So I will be honest.....since I started sewing I have been OBSESSED with making scrub tops for myself. The reason being its 50% easy to make, and 50% fun to pick out what materials and designs that you like. I buy 2 yards of fabric for everything I do. Because if I mess up I have more. I want the scraps for another project down the road. I'm thinking maybe I should make my own scrub line.  Happy Good Friday!! Until Next Time  ✌ Stephanie